How to Strap for Patella Dislocation and Instability

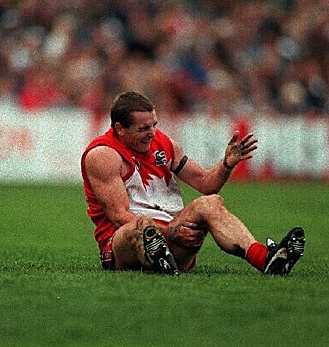
Patella Dislocation - Daryn CresswellPatella Dislocation is a knee injury that can regularly occur in sports that involve twisting motions of the knee, and where the patella (knee cap) is dislodged laterally out of the patellofemoral groove at the front of the knee.

Its is an injury that is most common in younger athletes, between 16-20 years old, but can also occur randomly by impact in contact sports.

Perhaps the most watched patella dislocation injury in the AFL history, was when Sydney Swan footballer, Daryn Cresswell, dislocated his kneecap and was trying desperately to knock it back into place.

Patella Instability Pain

[toc]Patella Instability is also a condition that is not as common as some of the injuries that we have covered so far, but can either cause excruciating pain if dislodged, or restricting athlete discomfort if the patella is not tracking properly in the patellofemoral groove.

In this article of the SportStrap “How to Strap” series, I’d like to take a closer look at the injury itself, and how to strap for patella dislocation and instability.

How is the Patella Injured

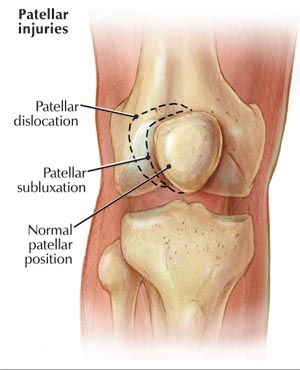
There are varing degrees of Patella injuries from Patella Subluxation through to Patella Dislocation.
Patella Injuries

Patella Sublaxation is where the an unstable patella, or knee cap, does not track centrally in the groove at the end of the thigh bone as the knee bend, causing discomfort to the sides of the knee. This can be common in younger athletes, and can be hereditary.

Patella Dislocation is where the knee cap is dislodged for the groove, and it normally occurs in two ways:

  1. A direct impact to the front of the knee, knocking the patella laterally out of place.
  2. Quadriceps tendons & ligaments attached to the patella act awkwardly during twisting motions of the knee, forcing the patella out of place.

Below is a video showing a great technique for strapping Patella Instability using Sports Tape, by highly experienced Sports Trainer, Cam Wray. Enjoy!

Best Patella Strapping Technique

[youtube]https://www.youtube.com/watch?v=gqfjOLcdhfQ[/youtube]

What items do you need to Strap for Patella Instability?

To strap a patella properly, you are going to need the following items:

[bc_product_display id=”248″]

[bc_product_display id=”61″]

 Optional items you may wish to use:

[bc_product_display id=”98″]

[bc_product_display id=”169″]

[bc_product_display id=”90″]

Preparation to Tape a Patella

For the best results when patella strapping, it is recommended to prepare the knee by doing the following:

  • Shave off any hair around the area being taped (Hairy guys only).
  • Ensure the hand is clean from dirt or oil.
  • It is recommended to use Pre-Tape Spray for better adhesion

What is the Right Tape Tension.

When taping this method it is important not to tape the anchors to tight, as it will restrict the players movement, cause discomfort and possibly restrict blood flow.

When taping the McConnell technique its important to apply good tension pulling the knee-cap back toward the inner side of the leg

Here’s What You Need To Do Next…

First…

While this method is quiet simple, make sure you practice it once or twice in the next week, while its fresh in your mind.

Then…

I want you to leave me a comment on this page, and let me know how you plan on using what you learned from this edition of SportStrap “How To Strap” series.

And finally…

Let me know what you think of the SportStrap “How To Strap” series. This is the sixth episode, and I’d love to hear how much you’ve enjoyed it, and even what you’d like me to cover next. Remember subscribe to this newsletter below if you haven’t already.

For links to Previous episodes, here you go:

[optin]

Have a most outstanding day,

Cade Arnel

SportStrap.com.au


ankle injury

How To Tape An Ankle For Extreme Support

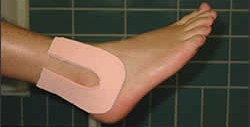
In the beginning of our ‘How To Strap’ series, we looked at a simple method of “How to Strap an Ankle“. In this article I would like to expand on that, by showing you how to tape an ankle that is extremely unstable, or that needs extra support.

Most ankle injuries occur when the ankle or foot is rolled to an inverted position, where the lateral ligaments on the outside of the ankle can be sprained or damaged. This type of injury is very common in running-sports like Football, Rugby, Netball, Basketball & Soccer.

Ankle Injury

Re-Occurring Ankle Injuries & Ankle Instability

Sometimes an athlete may have a history of a re-occuring ankle sprain, where the ankle may feel weak, and they don’t trust the stability of the joint during physical activity. In this case, extra ankle support is required to give the ankle stability and the althete the confidence to compete at their best.

I would like to share with you a video that shows a great technique for providing extra support for the ankle using ankle strapping tape, courtesy of highly experienced Sports Trainer, Cam Wray. Enjoy!

Great Technique to Tape an Ankle for Extra Support

[youtube width=”480″ height=”360″]http://www.youtube.com/watch?v=2sRtN-gngn0[/youtube]

As you can see from the video, this technique is very similiar to the Cam’s basic ankle taping method, with the use of anchors and 2-3 stirrups. He also uses 3 Adidas strips on the outside of the ankle and then finishes off with 2 calcaneal sling techniques (half heal locks) alternating on opposite sides.

While learning how to tape an ankle correctly is important, so is using quality of supplies for the job.

What items do you need to Tape an Ankle?

Fortunately, you don’t need to many different supplies to tape an ankle. But to get the job done properly, you will need the following items depending on your exact purpose:

[bc_product_display id=”248″]

[bc_product_display id=”61″]

Optional items you may wish to use: 

[bc_product_display id=”98″]

[bc_product_display id=”169″]

[bc_product_display id=”39″]

[bc_product_display id=”90″]

Preparation to Strap an Ankle

As previously, for optimum results when taping the ankle, it is recommended to prepare the ankle by doing the following:Ankle Protection

  • Shave off any hair around the area on the ankle being taped.
  • Cover any wounds with Non-Stick Wound pads
  • Use Orthopedic foam padding to protect any tender areas at the sides, front or top of the ankle or back of the achillies.

Ankle Injury Management

As with most ligament injuries, active physiotherapy rehabilitation is the best form of treatment for chronic ankle instability. This normally includes soft tissue massage and strengthening motion exercises, which are ideal to stimulate ligament repair and strength.

Good ankle taping techniques during this period can really assist to speed up recovery, and reduce the time where an athlete is out of action.

But as always, seek advice from a professional physiotherapist for a proper diagnosis.

Did this Article Help?

This article is the 5th article in the SportStrap’s “How To Strap A …….” series, in case you missed the previous articles, you can find them here:

And if you found this article helpful, please share the love by completing the following:

  • Subscribe to our Newsletter below to receive more “How To” articles as released.
  • Leave a comment below, to let me know:
    • Your experience with strapping an ankles,
    • Or any questions you have about strapping ankles!
  • Add your “Like” to our SportStrap Facebook fan page

[optin]

Have a most outstanding day,

Cade Arnel

SportStrap.com.au ©2012

strap a thumb

How To Strap A Thumb

Thumb injury prevention is a topic which is close to my heart, having suffered a major thumb injury during the my own playing days, with a fractured scaphoid.  So in this weeks article of SportStraps “How to Strap” series, I’d like to take a closer look at how to strap a thumb.

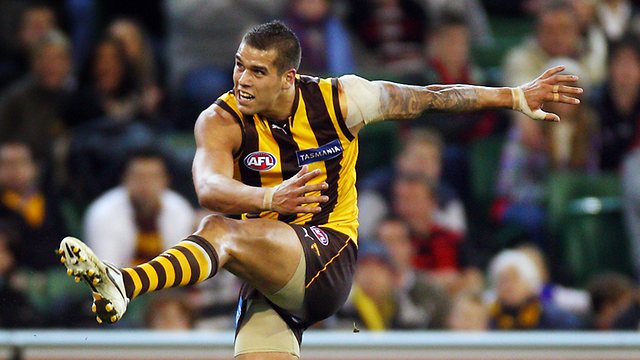
Lance Franklin Strapped Thumb

How is the Thumb Injured

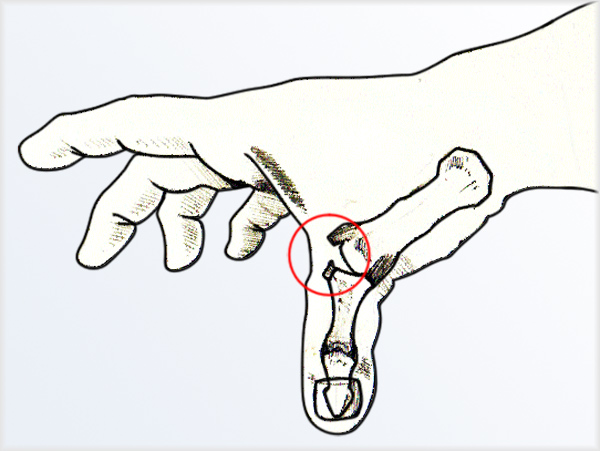
[toc]One of the most common thumb injuries is the ulnar collateral ligament injury, or sprained thumb injury, where the  ligaments of the thumb that support the pinch or grasp activites is strained, or torn.

During a fall while playing sports, there is a natural tendancy to use the palm to cushion the impact, and sometimes the thumb can get caught in the wrong way, and cause a thumb sprain.

Thumb Anatomy

The thumb can also be subjected to being caught in the wrong place at the wrong time, like being caught in a jumper or hit awkwardly with the ball. While the ligament can usually heal relatively quickly, if the surrounding thumb ligaments are injured repeatedly they can become weakened or stretched.

So a good thumb taping technique is important for both thumb injury prevention and to assist the player to continue playing with injury.

Below is a video showing a great technique for strapping the thumb using Sports Tape, by highly experienced Sports Trainer, Cam Wray. If you have read the previous “How to Strap” articles, who will know that Cam needs no introduction, having been a trainer for many first class clubs around the world and Australia. Enjoy!

How to Strap a Thumb

[youtube]http://www.youtube.com/watch?v=kxm0AkC2n4I[/youtube]

Its clear in the video, that Cam’s method is different to the old method, and gives great support to the Collateral Ligament and Thumb Joint.

In this technique the hand is in a relaxed open position, with the tape applied as follows:

  1. Elastic Adhesive Bandage applied in 4-5 times alternating passes, starting on the back of the hand and passing between the thumb and index finger, around the thumb and back of hand to the base of the palm.
  2. Finish off with Rigid Strapping Tape with the same technique with 1-2 passes, not to tight, just to hold it all together and give extra support.

As well as using the correct thumb taping technique, its also important to use quality supplies, so lets have a look at what is needed to complete the job.

What items do you need to Strap a Thumb?

To strap a thumb properly, you are going to need the following items:

[bc_product_display id=”248″]

[bc_product_display id=”61″]

Optional items you may wish to use:

[bc_product_display id=”33″]

[bc_product_display id=”90″]

Preparation to Tape a Thumb

For the best results when thumb strapping, it is recommended to prepare the thumb by doing the following:

  • Shave off any hair around the area on the back of the hand being taped (Hairy guys only).
  • Ensure the hand is clean from dirt or oil.

What is the Right Tape Tension.

When taping a thumb its important comfort and to maintain usability of the thumb and hand, that the thumb is not taped too tight, or taped with the wrong technique, as it will prevent the blood flow or even worse cause the thumb to stick out and increase the risk of injury.

To strap a thumb to the correct tension, you simply need to take care to lay the Elastic Adhesive Bandage on the skin with little tape tension.

More “How to Strap” Articles?

Though this is the fourth article, there are three other articles in the SportStrap “How to Strap” series. So far we have looked how to prevent ankle, shoulder and knee injuries with some great strapping techniques.

In case you missed the articles, you can find them here:

If you found this article helpful please complete the following:

    • Subscribe to our Newsletter below to receive more “How To” articles as released.
    • Leave a comment below, to let me know:
      • Your experience with strapping a thumb,
      • Or any questions you have about how to tape a thumb!
    • Add your “Like” to the SportStrap fan page
[optin]

Have a most outstanding day,

Cade Arnel

SportStrap.com.au ©2011